
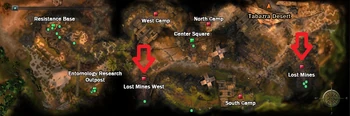
Lost Mines West is the 2nd dungeon located in the Lost Mines region (see the red arrow on the left).
It is to the west of the other dungeon, in the area of the White Lion Hopefuls and Judges.
Overview[]
This is a raid dungeon, unlike the previous, therefore it requires 2 parties (4 people minimum) in a raid to enter.
- Time Limits:
- Daily Limits: Once a Week
- Level Limits:
- Party Members Required: 4 members at least/2 parties in a Raid
- Key/Crystal Needed: None
Note: If a member has a saved instance, they can be raid leader and the group can start where that person left off. Click "X" to check dungeon/instance information. Otherwise, a person can not enter if they have a saved instance.
There are 5 quests for Lost Mines West:
| Lvl | Quest Name | NPC | Task to Complete |
|---|---|---|---|
| 50 | [Raid] The Ultimate Leather | Merchant Taylor | Kill Virgil |
| 50 | [Raid] The Flame Dragon | Captain Broski | Kill Apophis |
| 50 | [Raid] Soul Stones | Theletar Peralta | Kill Osmanova, Cepeda, and Meira |
| 50 | [Raid] Missing Brother | Jimmy Perkins | Kill Bazheni and Kaladohni |
| 50 | [Raid] The Flame Demon | Sir Alberstein | Kill Virgil |
Inside the Dungeon[]

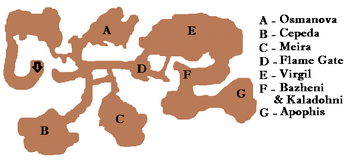
There are 2 parts to this dungeon, seperated by the Flame Gate. The 1st section contains the bosses: Osmanova, Cepeda, and Meira.
After defeating all three, the Flame Gate teleport will be revealed and will warp you to the 2nd section that contains Virgil, Bazheni, Kaladohni, and Apophis.
Inside the Dungeon[]
When you enter the dungeon, in the 1st section, you will encounter Admirers of Meira (Sanja-type), Eyes of Osmanova (Jellyfish-type), and Burning Spirits (Spirit-type). The mobs are relatively easy to defeat if you only pull as many as your party can handle. If you have a higher leveled party, they shouldn't give you much trouble. Clearing the pathways in this dungeon is very much the same as others, there is no special technique to this.
Osmanova's Room[]
Osmanova is in a large northern room and there are several Eyes of Osmanova located with him. Best way to clear this room and defeat him is to pull 1-2 Eyes at a time and then challenge the boss with as few mobs around as possible, last preferably. This boss is usually not seen until he is hit with an AoE or aggro, so players should be careful to only pull 1-2 mobs at a time to minimize risk of pulling him with the mobs.
Cepeda's Room[]
Cepeda is located in a large southwestern room with several Burning Spirits. Same as before, kill Spirits before confront the boss if possible so the party can focus all of their attention on him. He is usually patrolling the farthest end of the room, but he's much more visible than Osmanova.
Meira's Room[]
Meira is located in a large southeastern room with Admirers of Meira. Meira is a smaller (in stature) boss than the others making it slightly difficult to see. So be careful if players are running around attacking everything, but otherwise this boss is relatively easy to defeat.
Flame Gate[]
Once all 3 of the bosses are dead, go to the Flame Gate and the teleport should be available. Although you are being warped to a seperate section, you are still on the same map. The Gate is actually located above the "D" on the map above (in the tunnel).
There is another area in a tunnel slightly south that looks exactly like where the Flame Gate should be. So if you killed all 3 and the Gate is not there, you are in the wrong area.
Virgil[]
You will encounter Virgil's Emissarys and then Virgil is at the right end of the map. Virgil has some powerful, fast attacks and uses a few buffs. The most noteworthy one is the Reflect Damage buff which is called Force Field of Blood, it reflects all damage taken on himself back on to the party members. This can easily wipe the entire party if they continue to attack while the buff is active.
When you see him roar, watch for the buff (red/black symbol) and anyone that notices should immediately warn the party members to stop attacking. While its active, no attacking, just pot and heal until it ends. You probably should also turn off auto attack while facing him. He also has an AoE silence buff. There is another buff he uses that has the same or similar symbol, this one only increases his damage. Scroll over his buffs to check the names if unsure.
Bazheni & Kaladohni[]
Once Virgil has been defeated, you will find Virgil's Emissarys and Lava Guards. Kill them one at a time and move on. Continuing in that same direction are 2 more bosses, Bazheni and Kaladohni. When you get to these guys, make sure to only pull one at a time. They are relatively easy to defeat, but close to each other and it would be easy to draw the attention of both. They are fairly unremarkable as far as attacks and buffs go, they do have some AoEs though.
Apophis[]
Turning to the southeast, you will find Bodyguards of Malik. At the very end surrounded by small hills is Apophis. He has some AoEs and has some very powerful attacks. He also moves frequently to spray the area with fire breath so never assume you are in a safe spot.
")
")
")
")
")
")
Drops[]
Normal Mobs: Materials, Level 48 Equips
Gold Crowns: Materials, Level 50 Unique Equips